Table of Content
If it’s rootbound, you may have to tease the roots apart to help it grow. Withhold fertilizer for at least 6 weeks to allow the plant to adjust to its new home. First, sort through your stuff to determine what you really use and what you wouldn’t miss. Donate items you no longer need to a school, a homeless center, an animal shelter, your church, or your favorite charity. Stand-alone solar path lights are mounted on a spike that easily slides into the ground. Simply place one every 6 to 8 feet, although you can put them closer for a brighter walkway.

Hands down our favorite way to makeover rooms is with paint. Finally have a place to neatly store all those legos. We just love the clean look and functionality of this desk. This small desk is perfect for those who need to create a desk in a compact area. We just love this fresh DIY desk and home office nook idea.
Select colorful slate for a bold DIY path
Use two screws at each bracket to make everything extra secure. What we like about this DIY project is that you can apply any finish to this workstation your heart desires. For example, you can use chalkboard paint to create a touch of magic on its surface. Visit Shanty 2 Chic to discover all the necessary instructions for making this lovely DIY L-shaped desk. This way, you will keep all your work supplies organized and set up the best conditions for using your laptop or doing paperwork. You can even use this piece of furniture as a reading station in your bedroom.

Instead use fast-growing and fragrant ground cover plants to fill in the bulk of the path, saving outlay on paving stones, gravel and other costly aggregates. Because everyone’s style is individual, customized pieces with a high-end look are what we’re always after. You should pick an accent color that gives you energy when looking at it.
DIY Paint Projects
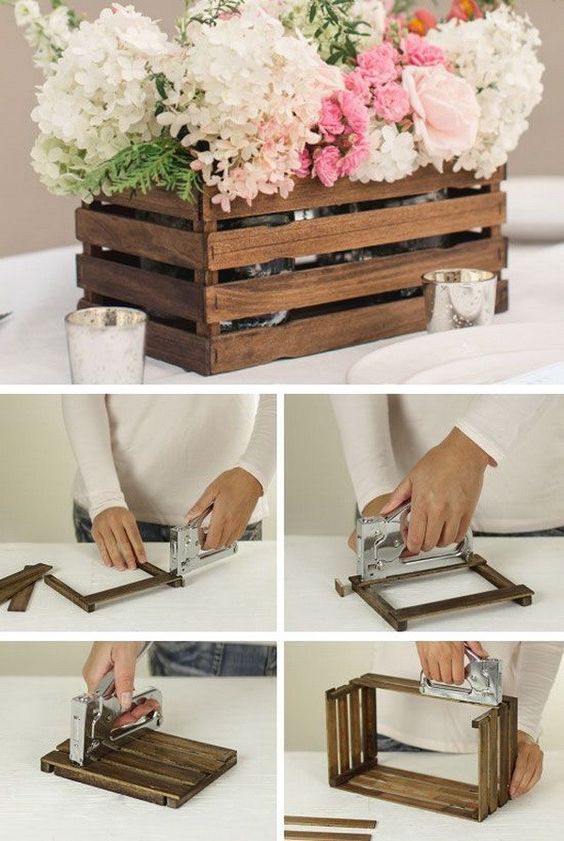
The good news is that, if you don’t already have them, you can find large wooden crates for free or at a meager cost. These are available in many stores, usually near the produce section of your local supermarket. Just talk to some employees and ask if they have anything old lying around. Building takes time, so you won't be able to move in right away, and it could potentially take longer to build than projected. There might be some unexpected additional costs that crop up also. Specialty companies supply and install kitchen and bath cabinets.
Consider the type of recording you plan to do, the space you have available, and your budget. Choose the right equipment based on your needs, such as an audio interface, microphone, headphones and speakers. Finally, set up in a way that reduces sound interference and maintains a good acoustical environment. Your home studio can be as simple or complex as you need it to be. 'Circular paving stones add character and charm to every space, and are great for smaller gardens as the path doesn't need to take up too much room,' says Rowan Cripps. However, there are a few dos and don'ts of designing a path with these materials.
Build Reclaimed Wood Rustic Bathroom Shelving
Now that you've done your headboard, why not upgrade that boring nightstand in your bedroom, too? It only takes a couple hours to create a custom piece. "I used chalk paint and a stencil to create this bone inlay look for a fraction of the cost" of a new piece, says Poe.
“A rain showerhead installed in the ceiling — or, better yet, multiple showerheads — makes you feel like you're on vacation,” Boyd says. Built-in shower seating is luxurious today and practical for tomorrow. “Next upgrade, I'd spring for a fancy bidet toilet." Also, “remove screen doors or storm doors, since that's just another barrier to accessibility,” she says. And front doors should be a minimum of 34 inches wide, with “swing clear” hinges to maximize the entry width. This will cut costs and allow you to fill out the rest of the path with a less-expensive material, such as gravel.
Simple Rennie Mackintosh End Tables
And if you need more storage, consider building floating shelves. We absolutely adore the mail holder showcased in this image, which was repurposed into a file folder to match the sturdy desk. If the door has chippy paint, you can leave it as it is to preserve the natural vintage feel. However, you might be interested in painting the apron and legs to a color that matches your overall decor, like black or white.
Rustic barn doors have become popular recently and we've got the plans to create your own rustic barn door. Getting that distressed look is one of those DIY home projects that can be done without spending a lot of money and still looks great. His versatile cherry shelf goes together in a few hours, and with a quick-drying finish you can have it on the wall in a day. The extra-wide top makes it perfect for books, antiques and collectibles. Build it before lunch—spray on the finish after dinner. Wouldn't it be nice to have all your gardening tools and supplies in one handy location?
Not only can you save money by tackling DIY projects for home, but you can learn useful skills along the way. Building these skills may boost your mental capacity, and in the process, you may discover new passions and greater confidence. DIY at home can also provide creative ways to express yourself.

With just a little tape and some chalkboard paint, you can create a gorgeous reusable wall calendar that doesn't take up even an inch of space. Martin says this is one of the first projects she tackled in her workspace. "I sketched it out in my notepad, and then spread the blue painter's tape into the squares, making sure they lined up as I wanted," she says. "I applied black chalkboard paint with a brush in even lines. I commissioned local sign artist Jenn Ulrich to paint the scripty words on." Use your imagination to add personality to your stairway to make your home extraordinary.
If you’re having a baby, you might be in that nesting phase of life where you want to make your home welcoming and perfect for your new bundle of joy. Plus, its organized compartments will make it easy for you to find a new outfit when an accident happens in the middle of the night. Fashionistas can have their own glamorous fashion show in this DIY closet in the style of a dressing room. This DIY project will take a few days, so carve out a weekend to get the job done. If you’re looking to get your dream closet on a budget, consider this DIY.
After you have removed the old caulk and cleaned the area with vinegar, bleach, or liquid caulk remover, let it dry. You may want to tape off the area to avoid getting unwanted caulk on the walls. Once you’re ready, use scissors or a utility knife to cut the tip of the caulk tube at a 45-degree angle.


No comments:
Post a Comment